
If you want to roll the perfect blunt, it really boils down to three things: great ingredients, a good grind, and a little bit of patience. Getting the prep work and the "tuck and roll" technique down is what separates a frustrating, canoe-prone smoke from a slow-burning work of art.
Gathering Your Essential Blunt Rolling Toolkit
Before you even get started, remember that a great blunt is built on a solid foundation. It's just like cooking—the final product is only ever as good as the ingredients you put into it. This isn't about following a strict set of rules, but about making choices that set you up for success.
Your first major decision is the wrap. This single choice has a huge impact on the blunt's flavor, smell, and how evenly it burns.
Choosing Your Ideal Blunt Wrap
To help you decide, here’s a quick breakdown of the most common options you'll find. Each one offers a totally different experience.
| Wrap Type | Material | Common Brands | Flavor Profile | Rolling Difficulty |
|---|---|---|---|---|
| Classic Cigarillo | Processed Tobacco | Swisher Sweets, Dutch Masters | Sweet, distinct tobacco notes | Easy to Moderate |
| Natural Leaf | Whole Tobacco Leaf | Backwoods, Game Leaf | Rich, earthy, robust | Difficult |
| Hemp Wraps | Industrial Hemp | High Hemp, Juicy Jay's | Neutral, clean, lets flower shine | Easy to Moderate |
Classic cigarillos are the old-school standard, requiring you to split the wrap and empty the tobacco. Natural leaf wraps like Backwoods are a connoisseur's favorite for their slow burn, but they can be a real challenge to handle. And for anyone avoiding tobacco, hemp wraps are the perfect alternative, offering a clean taste that won’t overpower your flower.
Selecting Your Flower and Tools
Just as crucial as the wrap is the cannabis flower itself. This is one area where you absolutely shouldn't cut corners. You're looking for flower that's been cured properly—it shouldn't be so dry that it turns to dust, but not so moist that it feels spongy. Flower that's too dry will burn up in a flash, while anything too damp will be tough to light and keep going.
For folks in Washington, DC, getting your hands on premium, lab-tested cannabis is simple. Delivery services like Green Express DC bring top-shelf, organic flower right to you. This kind of convenience is becoming the new normal. The cannabis delivery market is expected to explode from $2.95 billion in 2023 to a massive $18.65 billion by 2033, showing just how much people prefer trusted, easy access.
I can't stress this enough: no amount of rolling skill can salvage a blunt filled with dry, low-quality flower. Investing in fresh, sticky, well-cured cannabis will make an enormous difference in how it smokes.
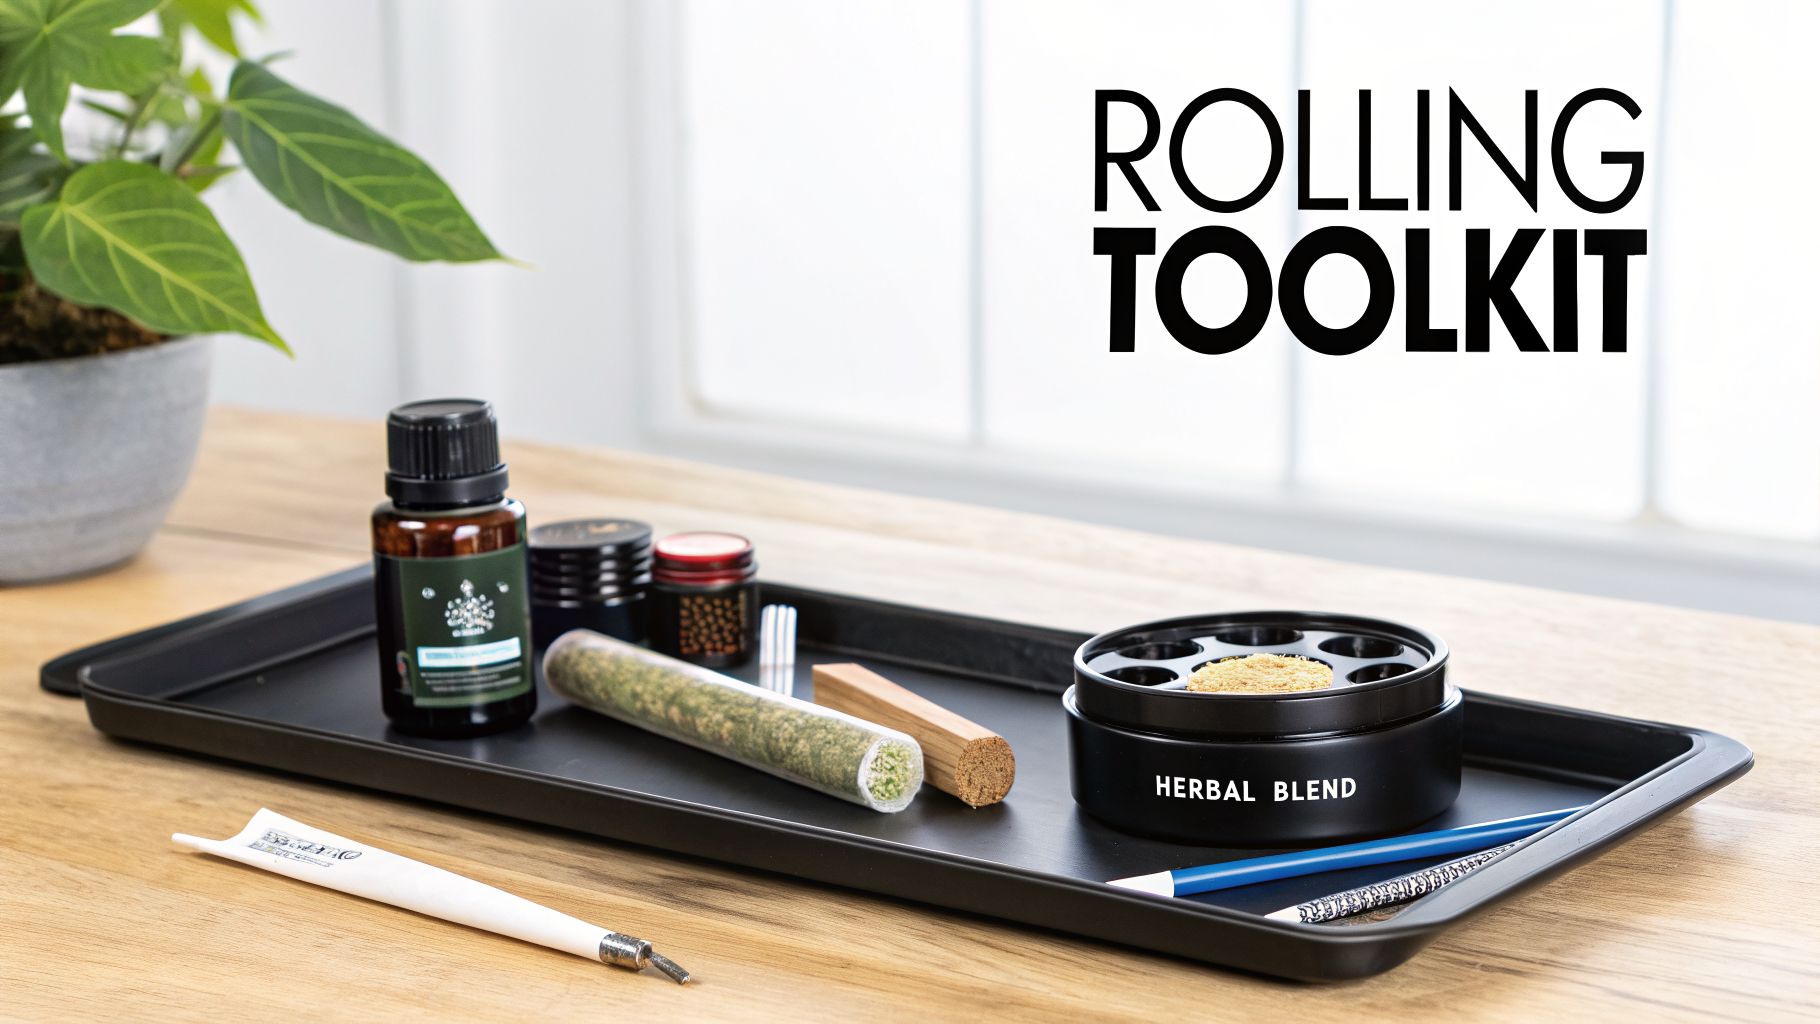
Beyond the main ingredients, a few tools will make your life a whole lot easier and take your rolling from sloppy to sharp. These aren't just for show; they help you get a consistent, clean result every time.
- A Solid Grinder: This is non-negotiable for achieving that perfect, even, medium-coarse grind. That consistency is exactly what you need to prevent "canoeing," where one side of your blunt burns way faster than the other.
- A Rolling Tray: A simple tray keeps your space clean, catches any stray flower, and gives you a dedicated surface to work on. No more wasting good product on your coffee table.
- Filters (or "Crutches"): While you can roll without one, I highly recommend using a filter. It adds structure to the mouthpiece, stops you from inhaling bits of flower, and lets you smoke the blunt all the way down without scorching your fingertips. If you want to see what a professionally made one is like, you can even check out a pre-made jumbo blunt roll.
Once you have this simple kit assembled, you’re in a great position to succeed. With quality materials and the right tools ready to go, it's time to get into the prep work, where the real craft of rolling begins.
Getting Your Flower and Wrap Ready
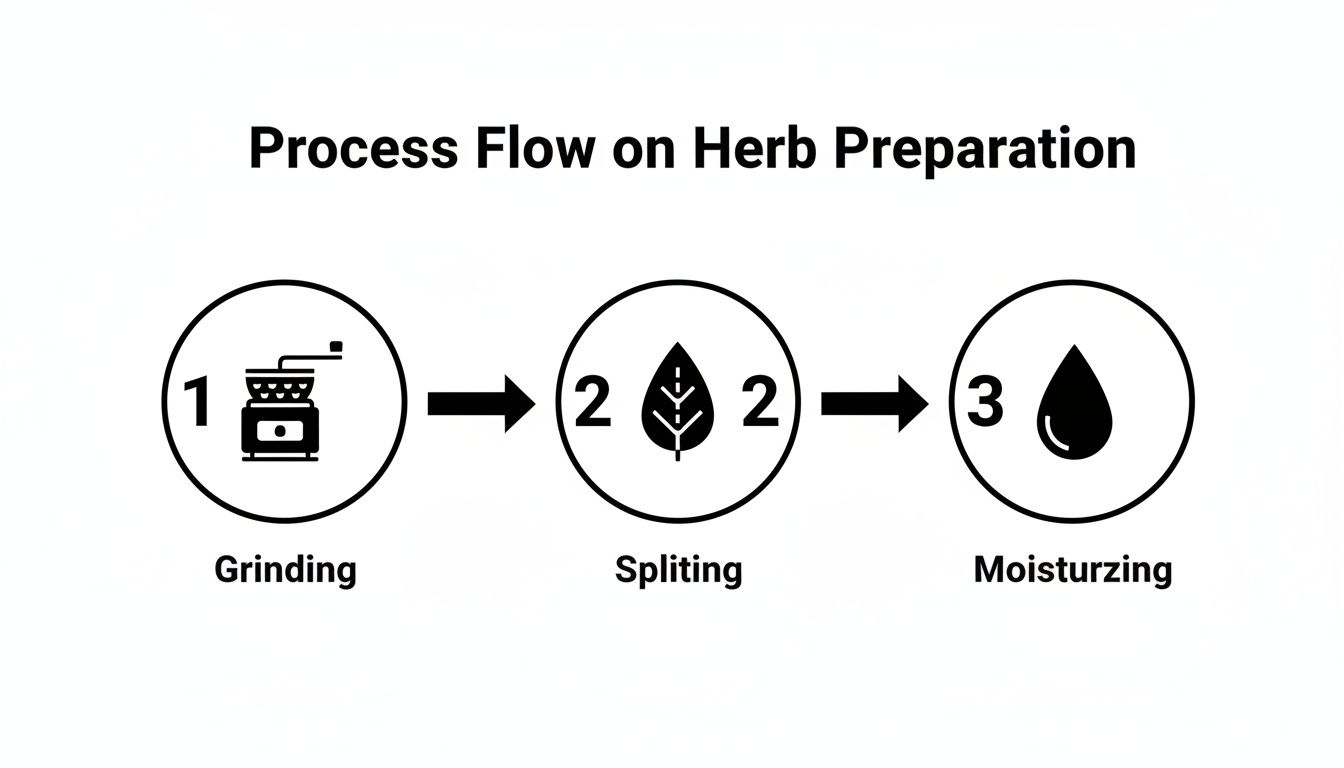
Anyone who’s been rolling for a while will tell you the same thing: the secret to a perfect blunt happens before you even start rolling. Think of it as prep work. If you rush this part, you're setting yourself up for a blunt that canoes, burns way too fast, or just falls apart in your fingers.
It all starts with the flower. You're aiming for a consistent, medium-coarse grind. The texture should feel like crumbled oregano, not a fine dust. Getting this right is absolutely essential for airflow, which is what lets the blunt burn slow and steady.
Why the Grind Matters So Much
If you grind your flower into a powder, it packs down too tight. This chokes off the airflow, making it a struggle to get a decent pull. But if you leave it too chunky, you create little air pockets that cause the wrap to burn unevenly down one side—the dreaded canoe.
A good, even grind gives you the perfect density for packing. It’s not just about a better smoking experience, either. It helps you get the most out of the flavor and potency of your flower. With the global cannabis cultivation market projected to hit an incredible $649.18 billion in 2025, there’s a massive industry focused on quality. You can read up on these cannabis industry trends for yourself. Doing that quality flower justice starts with a proper grind.
Prepping the Blunt Wrap
Once your flower is ground and ready, it’s time to prep your wrap. How you do this really depends on what you’re working with, whether it’s a classic cigarillo or a more rustic natural leaf.
For Cigarillos (like a Swisher or Dutch Master): Your goal here is to split the outer leaf in one clean line without tearing it. I find a small blade works best, but a sharp thumbnail will do the trick. Just make a straight, shallow cut from the mouthpiece all the way to the tip, then gently pry it open and dump out the tobacco guts.
For Natural Leaf Wraps (like a Backwoods): These take a bit more finesse. Instead of splitting it, you need to carefully unroll the leaf along its natural seam. If the leaf feels dry or brittle, stop. Forcing it is a surefire way to end up with a torn, useless wrap.
A dry, cracking wrap is the enemy. Here’s an old-school trick: hold it a few inches from your mouth and breathe on it gently. The warmth and moisture from your breath will make the leaf soft and pliable again without getting it soggy.
Nailing these prep steps is what really separates a beginner’s roll from a pro-level blunt. It might feel like extra work, but it pays off. Of course, if you want to skip the grinding entirely, you can always grab some high-quality exotic shake that’s already good to go.
With your materials perfectly prepped, you're ready for the main event—the tuck and roll.
Executing the Perfect Tuck and Roll
Alright, your flower is ground and your wrap is ready. This is it—the moment of truth. Getting the tuck and roll right is what separates a sad, loose blunt from a perfectly pearled, slow-burning masterpiece. Don't rush it. Patience and a steady hand are your best friends here.
First things first, let's load it up. Hold the wrap open like a little taco shell, cradling it in your fingers. Sprinkle your ground flower down the center, trying to get it as even as you can from end to end.
And I mean really even. Any lumps or bare spots are just asking for trouble, leading to that dreaded "canoe" where one side burns way faster than the other. Take a second to gently pat and shape the flower with your finger until it looks like a nice, uniform log. This small bit of prep work pays off big time.
The Art of the Tuck
Now for the move that trips everyone up at first: the tuck. This is the single most critical part of the roll, so take a deep breath and focus.
Gently hold the loaded wrap between your thumbs and index fingers. Your thumbs should be on the side closest to you, with your index fingers behind it for support.
Start rocking the wrap back and forth with your thumbs, which gently compresses the flower into a tight cylinder. You’ll feel it firming up. Once it feels solid, use your thumbs to push the front edge of the wrap down and tuck it snugly over and behind the flower.
Completing the Roll
Once you nail that initial tuck, you're on the home stretch. The rest is just guiding the wrap into place.
Continue rolling the blunt upwards with your thumbs, using your index fingers to keep the structure straight and tight. Don't force it. If the tuck was good, the wrap will almost want to roll itself. Your job is just to keep consistent, gentle pressure all the way up until only a small strip of the top edge is left.
Pro Tip: Ease up on the death grip. Squeezing too hard will either rip your wrap or pack the flower so tight you won't get any airflow. Think of it more like coaxing it into shape, not wrestling it into submission.
Look, your first few might be a little wonky, and that’s totally fine. Rolling is a hands-on skill. Every time you do it, you’re building muscle memory and getting a better feel for the right amount of pressure.
Key Motions for a Perfect Cylinder
To really level up your rolling game, keep these core movements in mind. They’re the foundation of a perfectly shaped blunt.
- The Cradle: Hold the wrap with a light but confident grip. Your hands are the framework, so keep them steady.
- The Compression Rock: That gentle back-and-forth rocking with your thumbs is what makes the flower dense enough to roll properly.
- The Thumb Tuck: This is the make-or-break motion. It needs to be a clean, decisive move where you use your thumbs to tuck the wrap's edge tightly around the flower.
- The Guided Finish: After the tuck, just let your thumbs roll it forward while your other fingers act as guide rails to keep it from getting lumpy or cone-shaped.
Don't get frustrated if it takes a few tries. Every single person who rolls well has a history of torn wraps and loose, disappointing blunts. It's just part of the process. With these techniques, you're ready for the final step: sealing it up.
The Final Touches: Sealing and Curing for a Perfect Burn
Alright, the rolling is done, and you're holding a pretty solid-looking blunt. But hold on, don't spark it up just yet. These last two steps—sealing and curing—are what separate an okay blunt from a fantastic one. They’re the secret to getting that slow, even, and satisfying burn every single time.
Getting the Seal Just Right
This is the classic "lick and stick" part of the process. You need just enough moisture to create a bond without turning your wrap into a soggy mess. Too much, and it'll get weak and tear; too little, and it'll pop open the second you light it.
Treat it like you're sealing an old-school envelope. Run your tongue lightly along the exposed edge of the wrap. Then, press it down firmly and run your finger along the seam to make sure it's completely sealed from end to end.
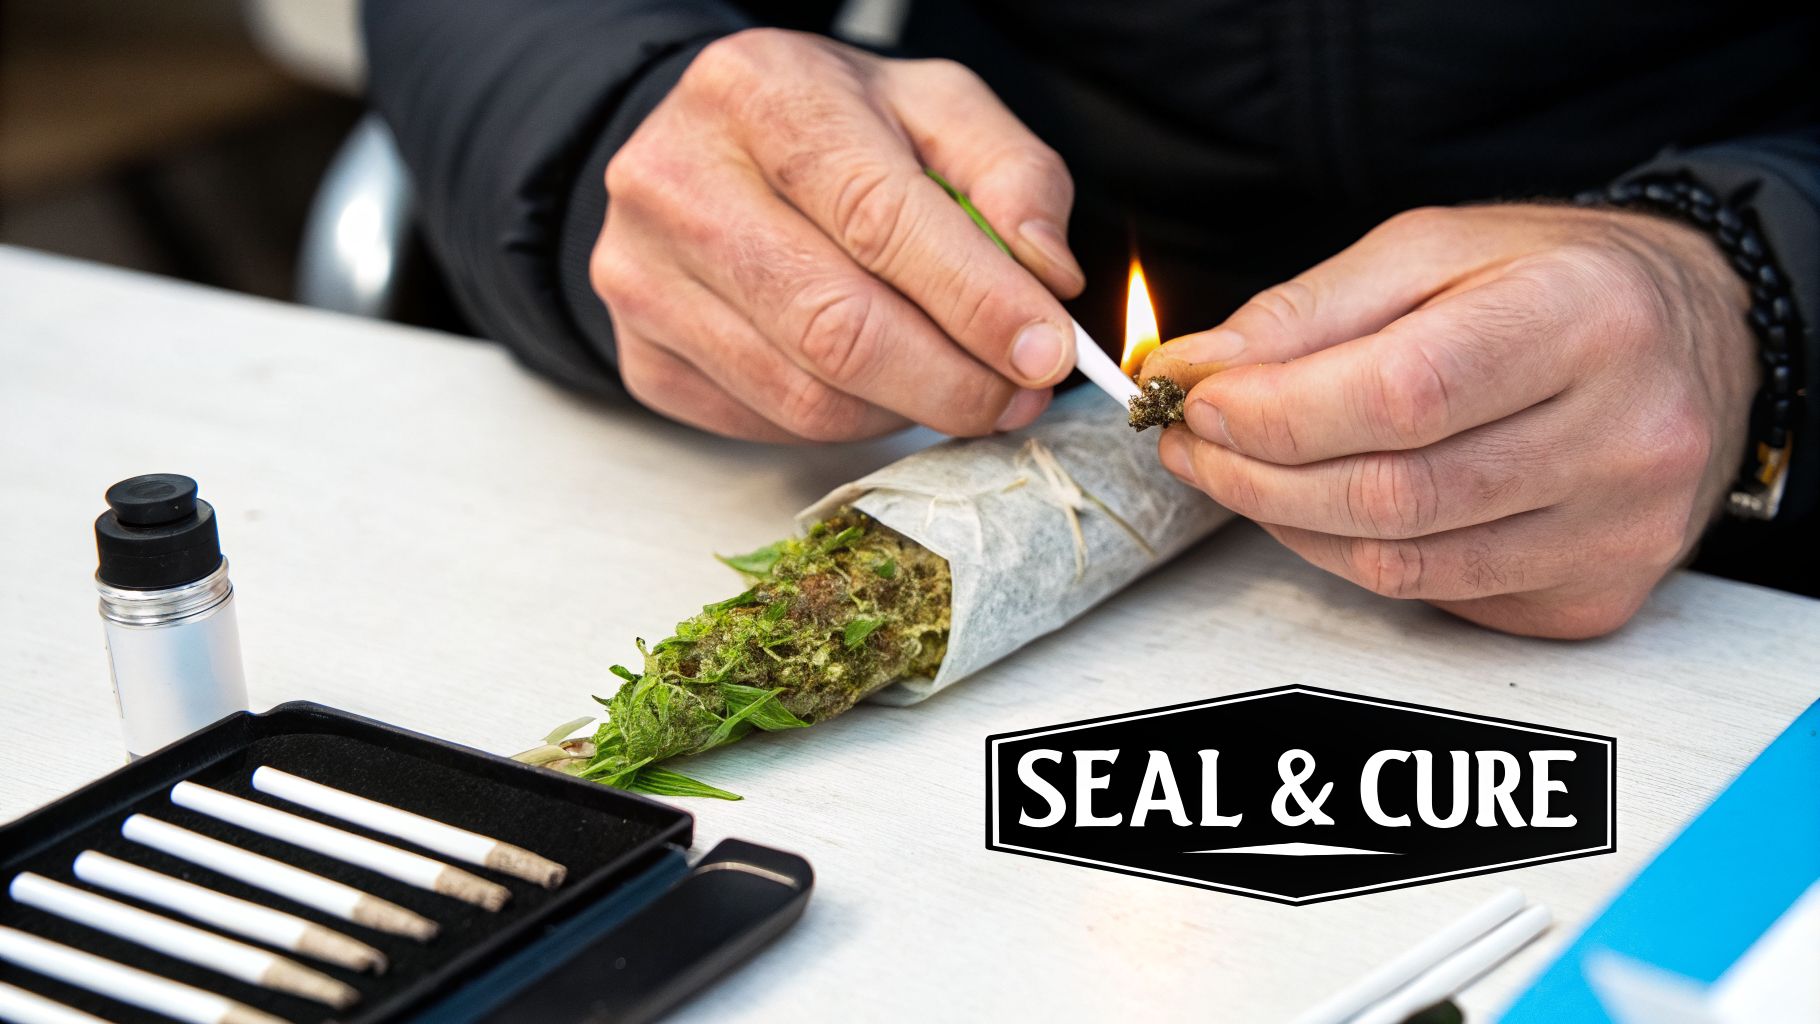
The Pro Move: Curing Your Blunt
Now for the step that so many people skip: curing, or "baking," the blunt. This simple trick makes a world of difference. It’s all about using the heat from a lighter to dry and tighten the wrap before you smoke.
Hold the flame a couple of inches away from the blunt and move it back and forth along the entire length. You're not trying to set it on fire—just warm it up. Pay close attention to the seam you just sealed. Never let the flame touch the wrap directly.
This quick toasting does a few crucial things:
- Locks the Seal: The heat instantly evaporates the moisture you just applied, cementing the seal.
- Firms It Up: The wrap will shrink just a little, making the whole blunt tighter and more compact.
- Prevents Canoeing: By driving out any lingering moisture, you guarantee a much more even burn.
Honestly, this little step is the key to mastering how to roll the perfect blunt. It’s what gives you that slow, smoldering smoke you’re after.
A Nod to Quality
This kind of careful technique is becoming more common as people get smarter about their cannabis. It’s not just about getting high; it’s about the quality of the entire experience. This growing appreciation is a big reason the global cannabis market was valued at $57 billion in 2023 and is expected to rocket to $137.67 billion by 2026. People want premium products, and they're willing to learn the right way to enjoy them. You can discover more insights about the cannabis market to see just how big this movement has become.
The final seal and cure are your last quality control checks. A weak seal or a damp wrap can ruin all the work you just put in. Taking an extra 30 seconds to properly bake your blunt is always worth the effort.
Getting these finishing touches right shows a real respect for the craft and the flower you’re using. It’s the difference between just smoking a blunt and truly enjoying one that you rolled perfectly yourself.
Dealing with Common Blunt Rolling Problems
Even after you think you’ve got it down, things can go wrong. A sudden tear, a stubborn side-burn, or a wrap that’s just too tight to hit can frustrate anyone. But trust me, we’ve all been there, and nearly every rolling mishap has a pretty simple fix.
Don't toss that wrap just yet. Think of these little mistakes as part of the learning curve. Knowing how to salvage a roll is just as crucial as knowing how to start one. Let's walk through the most common headaches and how to get past them.
The Dreaded Canoe
You light up your perfectly rolled blunt, only to watch one side burn down way faster than the other. That annoying side-burn, which we all call "canoeing," is a classic problem. It almost always boils down to an uneven grind or a patchy pack.
If your flower is a mix of big chunks and fine powder, the dusty bits will catch fire way faster, causing that burn line to run. Same thing happens if you pack the herb loosely on one side and tightly on the other—the loose side gets more air and burns quicker.
- The Fix: Your best bet is to prevent it from happening in the first place. Go for a consistent, medium grind and spend an extra second spreading the flower evenly before you tuck. If a canoe starts to form, you can often correct it by rotating the blunt so the slower-burning side is on the bottom. Gravity and heat will help it catch up.
Your Blunt Is Rolled Too Tight
It looks amazing—a firm, beautiful cylinder. But when you try to take a pull, it feels like you're trying to suck a golf ball through a garden hose. A blunt that’s rolled too tight has zero airflow, making it basically unsmokable.
This usually happens when you get a little too aggressive with the tuck, compressing the flower into a solid log.
Quick Tip: Before you seal it, give the blunt a gentle squeeze. It should have a little give, feeling firm like a cigarette, not hard as a rock. If it’s got no bounce, it’s probably too tight.
To fix this, try gently massaging the blunt between your fingers, rolling it back and forth to loosen the flower inside. If that doesn't do the trick, you might have to get a little surgical. Carefully work a paperclip or a thin skewer down the center from the mouthpiece to create a small air channel.
The Blunt Burns Too Fast
If your blunt is gone in a flash, the problem is often the flower itself. Cannabis that's too dry will burn up incredibly fast, turning what should be a slow, relaxing session into a race against time.
A loose roll can also be the culprit. All that extra air flowing through the wrap acts like a fuel for the fire, making it burn hot and fast. This not only wastes your flower but also leads to a harsher smoke.
The global cannabis cultivation market is on track to hit a massive $3,303.35 billion by 2035, which just goes to show how much science now goes into growing and curing top-tier flower. Properly cured cannabis has the perfect moisture content for a slow, even burn. For folks in Washington, DC, this means you can find premium, lab-tested flower from services like Green Express that’s been cured just right. You can learn more about the global cannabis market growth and see how it’s raising the bar for quality everywhere.
Repairing a Tear in Your Wrap
A small rip can feel like a disaster, especially if it happens when the blunt is already full. But don't give up! This is an easy patch job.
The simplest trick in the book is to use the gummy strip from a rolling paper as a bandage. Just tear off a tiny piece, lick the sticky side, and place it right over the hole. Smooth it down, and you’ve got a solid seal that won’t mess with the burn. This little hack has saved countless blunts from an untimely end.
Sometimes, seeing the problem and solution side-by-side makes it click. Here’s a quick reference guide to help you troubleshoot on the fly.
Common Blunt Rolling Problems and Fixes
| Problem | Likely Cause | How to Fix It |
|---|---|---|
| Canoeing (Uneven Burn) | Inconsistent grind or unevenly packed flower. | Prevention is key: Use an even grind and distribute flower uniformly. To correct mid-burn, rotate the blunt so the slow-burning side is at the bottom. |
| Too Tight to Draw | Over-compressing the flower during the tuck and roll. | Gently massage the blunt between your fingers to loosen the contents. If needed, carefully poke a skewer through the mouthpiece to create an air channel. |
| Burns Too Quickly | Flower is too dry, or the roll is too loose. | Use properly cured flower. Ensure your roll is firm and evenly packed to restrict airflow, promoting a slower burn. |
| Torn Wrap | The wrap was too dry, or it snagged during rolling. | Use the gummy strip from a rolling paper as a "bandage." Lick the adhesive and place it over the tear to create a seal. |
Keep this chart in mind, and you'll be able to tackle just about any rolling issue that comes your way.
Frequently Asked Questions About Rolling Blunts
Once you get the hang of rolling, you'll start running into the finer points. Honing your craft is all about asking the right questions and understanding the little tweaks that can totally change your experience. Let's tackle some of the most common questions that pop up for new and seasoned rollers alike.
Getting these details right can seriously upgrade the quality of your smoke.
How Much Flower Should I Use?
For your average blunt wrap, the magic number is usually between 1 and 2 grams of flower. Go with less than a gram, and you'll likely end up with a floppy, sad-looking blunt that’s tough to get right. Try to cram more than two grams in there, and it becomes a real challenge to roll, let alone get a decent puff from it.
A great starting point is 1.5 grams. That gives you enough material to form a nice, solid shape without overstuffing it. As you get more comfortable, you can start experimenting based on your wrap size and how you like to roll.
Is a Grinder Absolutely Necessary?
Not at all. You can absolutely roll a fantastic blunt without a grinder, and honestly, some of the best rollers I know prefer to break up their flower by hand. They’ll tell you that leaving the pieces a little larger—think pea-sized—actually helps with airflow and promotes a slower, more even burn.
If you find yourself without a grinder, you’ve got a couple of great options:
- By Hand: Just gently pull the nugs apart into small, uniform pieces. Your goal is to avoid grinding it into dust or "shake."
- Small Scissors: A pair of small scissors and a cup work wonders. This method gives you amazing control over the consistency, helping you get that perfect medium-coarse texture.
Getting a Slower, More Even Burn
Achieving that perfect, slow-burning blunt isn't about one magic trick—it's about getting three things right. It starts with a firm pack. You want it snug, but not so tight that air can't get through. Next, make sure your cannabis is properly cured. If it’s bone-dry, it'll just burn up in a flash. You want it to be just a little sticky.
Finally, your wrap choice is a huge factor. Natural leaf wraps like Backwoods are legendary for their slow-burning qualities, especially when compared to processed tobacco or hemp wraps. Nail these three things and add a final "curing" pass with your lighter, and you're set for a long, enjoyable session. Of course, if you want to skip the work and see how the pros do it, you can always check out some expertly crafted mini pre-rolls.
One of the biggest mistakes beginners make is rolling too loosely. A firm, consistent pack is essential for controlling airflow and slowing down the burn rate. Don't be afraid to gently compress the flower as you roll.